May 20, 2026 · Bill Ferguson
Rotor Rate for the Absolute Newb: How to Price Your First Drone Job
Brand new to pricing drone jobs? A friendly walkthrough of the free Rotor Rate calculator — what each field means, the research tiles (Maps, weather, fuel, airspace), and how to read the result so you stop underbidding.
So you got your Part 107, you bought the drone, and someone just texted you the line every new pilot dreads:
"Hey — how much would you charge to fly my property?"
Cue the napkin math. Cue the gut feeling. Cue the price you regret about thirty seconds after you send it.
That's exactly what Rotor Rate is built to fix. The **free calculator at rotorrate.com/calculator** is the same engine the paid app uses — no signup, no card, no nonsense. My name is Bill Ferguson, the creator of Rotor Rate and a fellow Part 107 commercial drone pilot, and I'm here to give you the nickel-tour: what the boxes mean, why they exist, and how to actually read the number it spits out.

Why "what should I charge?" is the wrong question
When you ask "what should I charge?" you're really asking three different questions stacked on top of each other:
- What does this job actually cost me to do? (vehicle, gas, time, wear & tear on gear — props, batteries, etc.)
- What's a fair profit on top of that?
- What's the market in my area willing to pay?
Most new pilots only think about #3, look at a Facebook group, see "$150 for real estate," and lock that in. Then they drive 60 miles round-trip, burn an hour and a half on site, and end up making about eleven dollars an hour after fuel, expenses, time on-site spent updating firmware instead of before the mission, detours or delays, and anything else Murphy can throw in the mix. Okay, maybe I'm being a bit overly-dramatic here, but you get the picture. We've all been there.
Rotor Rate stacks all three questions in one screen so you can see them at the same time.
Open the free calculator (no signup)
Head to rotorrate.com/calculator. You'll land on the free Pricing Calculator with the inputs on the left and the recommended price on the right. Hit "Try with sample job" at the top and both the Pricing Calculator and the Flat-Rate Evaluator fill in with a realistic, profitable example — perfect for poking at numbers before you type a single thing.
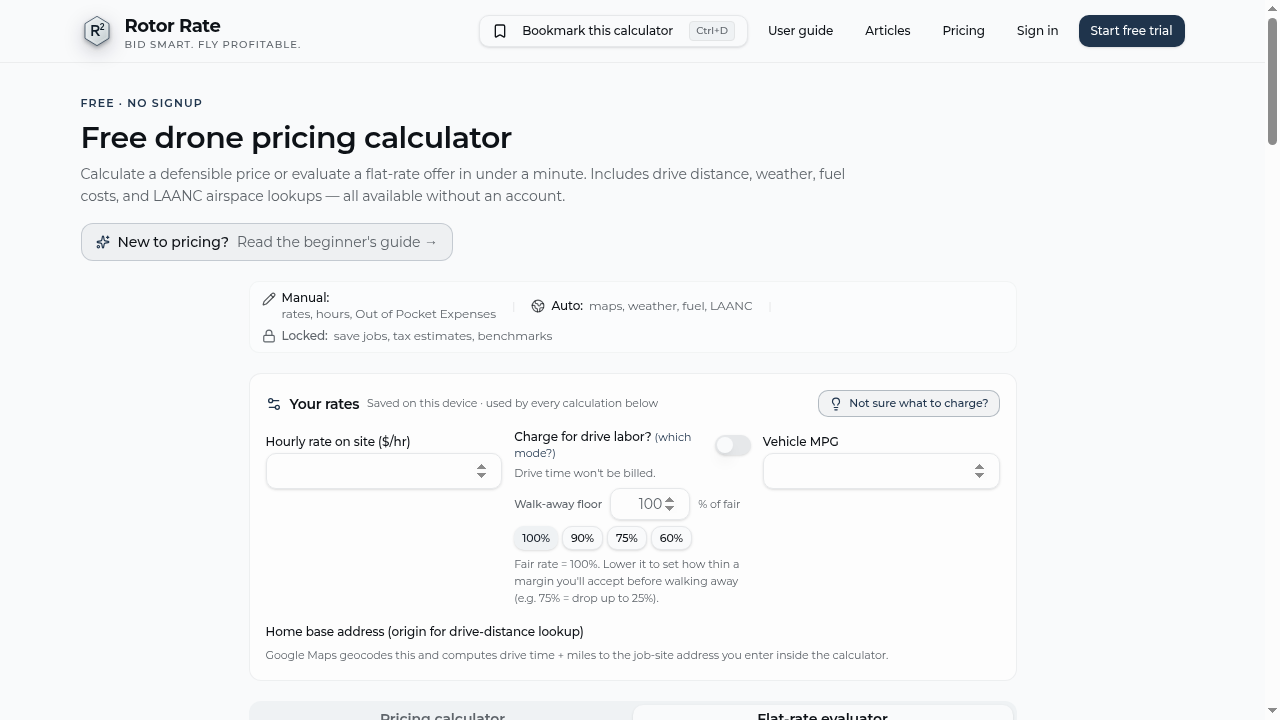
The free calculator uses sensible defaults so you can play with the inputs and watch the math update live. Set your home base address once at the top, paste a job-site address in the auto-fill box, and it pulls drive time, miles, weather, local/current fuel price, and LAANC airspace ceiling from real sources. In the paid app, your home base, your hourly rates, and your platform mix all save to your account so you don't have to re-type them for every job.
First-timer tip: click the "Take the tour" button (the little Play icon at the top). It walks you through every section — including the new "Not sure what to charge?" panel and the deliverable picker — and is the fastest way to get oriented.
Two kinds of calculators, two kinds of gigs
Rotor Rate actually runs two different calculators depending on how you get your work:
Pricing Calculator — for marketplaces where you name the price. For example, Droners.io, direct clients, Thumbtack, and the neighbor who found you on Instagram. You plug in the job details and the calculator tells you what to quote so you don't accidentally work for gas money.
Flat-Rate Evaluator — for platforms where they name the price. For example, Zeitview, FlyGuys, RAAD, and similar networks, or direct clients who post jobs at a fixed rate (say, "$85 for a 5-acre warehouse roof orthomosaic capture"). The calculator reverses the math: you punch in the flat offer, your drive, and your on-site time, and it tells you whether that number actually clears your costs and hits your hourly target. If it doesn't, you know to pass — or at least to negotiate from a position of data, not desperation.
Both use the same cost engine; they just answer opposite sides of the same question. Flip between them with the "Calculator Type" tabs near the top.
"Not sure what to charge?" — the starter panel
If you have absolutely no idea what your hourly rate should be, you're not alone — and Rotor Rate now has a dedicated panel just for you. By default the calculator opens with the rate boxes blank and a single "Not sure what to charge?" button in the top-right of the Your rates section. Click it and the starter panel unfolds:
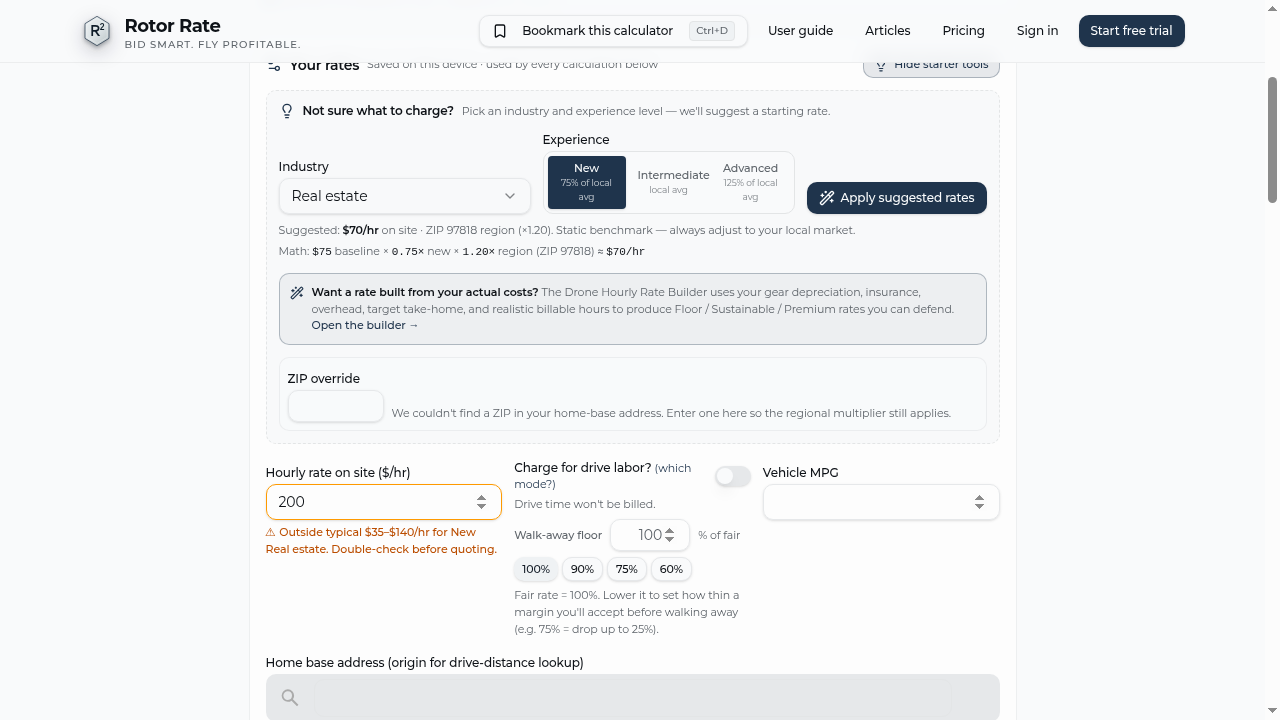
You get three things inside the panel:
- Industry + experience picker. Pick Real estate, Inspections, Mapping, etc. and your tier (New / Intermediate / Advanced). Rotor Rate suggests an hourly fly rate adjusted for your ZIP code's regional cost-of-living multiplier — and shows the exact math (`baseline × experience × region`) so you can see why. Tap Apply suggested rates to push it into the Hourly rate box.
- The Hourly Rate Builder. If you'd rather build a $/hr from the ground up (gear depreciation, insurance, overhead, target take-home, realistic billable hours), the "Want a rate built from your actual costs?" dialog links to the free Drone Pilot Hourly Rate Calculator. It produces Floor (break-even) / Sustainable / Premium rates you can defend with a spreadsheet.
- ZIP override. If your home-base address didn't geocode to a ZIP, drop one in manually so the regional multiplier still kicks in.
Once you've got a number, hit Hide starter tools and the panel collapses back out of the way — the rest of the calculator (Hourly rate, drive labor, MPG, home base) stays exactly as you left it. The starter panel is on-demand training wheels; you don't have to use it on every visit.
The fields, in plain English
Let's walk the left column top to bottom — assuming the starter panel is collapsed.
Hourly rate on site ($/hr), drive labor, MPG, home base
The always-visible Your rates row at the top. Set these once and they're saved on this device for every future calculation. If the rate you enter is way outside the typical band for your industry, Rotor Rate flags it with a small warning underneath ("Outside typical $35–$140/hr for New Real estate. Double-check before quoting.") — not to stop you, just to make sure it's a deliberate choice.
Home base
The address you'll usually drive from. Drive time and miles for every job get measured from here. In the paid version, you'll set it once and forget it.
Auto-fill from address
Paste a job address and Google Maps does the rest — drive time and distance are pulled automatically. Use the Round-trip / One-way toggle on the drive and mileage fields to enter whichever number you have handy; the calculator converts to the equivalent for you and shows both. Everything it fills in is editable, so if the route looks weird (traffic, ferries, that one bridge that's always closed) you can override it.

Drive time (round-trip or one-way)
Self-explanatory but people forget this constantly. If the job is an hour each way, that's two hours of your day before the props ever spin. Use the pill toggle above the field to enter whichever direction you have — the calculator shows the equivalent underneath so there's no mental math. The calculator charges your drive rate for this — which by default is lower than your fly rate, because driving isn't as billable as flying. For a detailed breakdown of how (and whether) to charge for windshield time, see Drive Time, Mileage & Margin: How to Charge for the Windshield Time.
Hours on site
Total time on the property — setup, flight, takedown, talking to the homeowner about whether their HOA is going to be a problem, etc. Be honest. A "30 minute" real estate shoot is almost never 30 minutes.
Miles (round-trip or one-way)
Enter whichever you have — the field has a Round-trip / One-way toggle and shows both values so you don't have to halve or double in your head. The calculator uses the total round-trip distance to figure your fuel cost based on the MPG and gas price in your settings. Gas price auto-fills from the EIA national average for your region — editable per job. note: don't forget to log mileage as it's an IRS tax deduction (automatically done and locked in when a mission is flagged as 'completed' in the paid version).
Out-of-pocket (food, parking, tolls, etc.)
Anything you anticipate spending on the day. Tolls. A $14 airport-garage parking fee. The drive-thru lunch on the way back. These get added to your costs so they show up in break-even, not eaten silently out of your profit. Note, you can save receipts and log/categorize all of your expenses in the paid version for tax purposes.
Industry + deliverable
Pick the industry (Residential Real Estate, Inspections, Mapping, etc.) so the calculator can apply the right rate band and the right "industry-typical" hints. Right below it is the Deliverable dropdown — pick the specific sub-type you're delivering (e.g. Photo package, Thermal map, Orthomosaic, 3D model, Data upload only). Two useful things happen when you pick a deliverable:
- The sensor / payload field auto-matches when it can — pick a thermal deliverable and the sensor flips to Thermal automatically (still editable). No more zero'd-out thermal jobs because you forgot to set the sensor.
- The default deliverable for network platforms (Zeitview, FlyGuys, RAAD, etc.) is now Data upload — because that's what those platforms actually pay you for. If a network also wants a finished deliverable, change the dropdown.
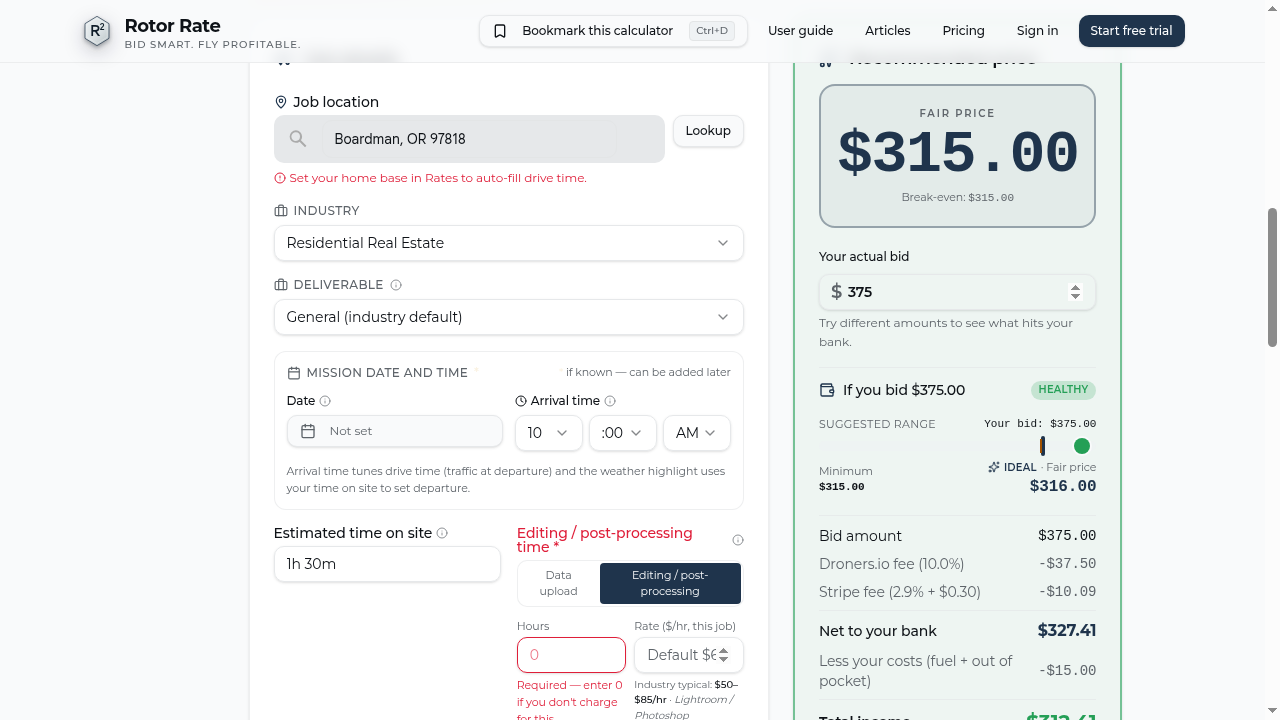
Processing & deliverables — now mandatory
The Processing & deliverables picker replaces the old single "post-processing hours" field: you can line-item each output (edit hours, data upload, thermal map, orthomosaic, etc.) at its own rate, or fall back to a single Hours × Rate entry if you prefer. Either way it's the last time-related section on the left — and the one most new pilots used to skip. It's now a required field: the Hours box is red until you type a number. If you genuinely don't charge for desk time on this job, enter 0 — that counts as "set" and the red goes away. The point isn't to force you to bill for it, it's to force you to decide whether you're billing for it.
A few things to know:
- Hours × Rate. Enter your honest desk time (editing, stitching, exporting, uploading) and the $/hr you want to charge for it.
- Industry-typical hint. Right under the rate, you'll see a small "Industry typical: $X–$Y/hr · Software" helper based on the industry you picked. If you leave the rate blank, the calculator falls back to that industry's midpoint so you're never silently zero-billing your desk hours.
- Editing vs. Data upload toggle. Pick a network platform up top and the field auto-flips to Data upload time defaulted to 50% of your on-site rate (it's babysit-the-progress-bar time, not creative labor). If a network client also wants deliverables, flip the toggle to Editing / post-processing and bill it at your edit rate instead.
Paid app tip — auto-fine-tuning. The paid app remembers your actual post-processing hours after every job and shows you a rolling 30-job average for each network + deliverable combo. So next time you pick "Zeitview · Thermal map," you'll see a hint like "Your avg for Zeitview · Thermal map: 1h 30m (from 8 jobs) — tap to use." Tap it and the field fills in. Your estimates get sharper every time you finish a job, automatically. Free users get the industry-typical hint; paid users get hints built from their own history.
For the full per-vertical breakdown (and the software stack each one expects), see What to Charge for Drone Post-Processing.
The research tiles (Maps, Weather, Fuel, LAANC)
This is the part of the free calculator most newbies don't realize is even there. Once you've set a job-site address, the tiles along the bottom light up with:
- Maps — exact drive route and round-trip miles
- Weather — forecast for your mission window so you know if Saturday morning is a wash
- Fuel — local gas price applied to your MPG
- Low Altitude Authorization and Notification Capability (LAANC) airspace — the Federal Aviation Administration (FAA) ceiling at the job site, with a direct link to file a request if you need one
All of that is free, no account required. Stop tab-hopping between five sites just to price a job.
How to read the right side

Here's what the right side is telling you, top to bottom:
- Recommended price (aka your fair rate) — the big number. This is what Rotor Rate thinks you should quote (Pricing Calculator), or what should be offered (Flat-Rate Evaluator), given your costs, your hourly rates, and the platform and/or processor fees (some networks skim up to ~10% off the top; each is a different calculation and pre-built for the existing networks in the calculator).
- Break-even — if you charge less than this, you lose money on the job. Tattoo it on your forearm (just not on your forehead please LOL).
- Net to your bank — what actually lands in your bank account after the network, or client's, fees (if any) and/or the payment processor's cut.
- Fuel and Expenses — How much gas will cost you for the round trip, based on current gas prices for the local area, and how much your projected expenses will be (if entered). This is how much you will be out of pocket to do the job.
- Profit — How much you'll actually make for the job (your net minus the fuel and other expenses).
A worked example
Let's run a real one. Suburban Dallas real estate shoot, 30 minutes from your house:
- Drive time, one-way: 0.5 hr
- Hours on site: 0.75 hr
- Miles one-way: 22
- Out of pocket: $0
- Deliverable: Photo package · Post-processing: 1.0 hr @ $65/hr
With the default $200/hr fly, $75/hr drive, regional gas price, 24 mpg, 10% platform fee, you'll get a recommended price in the $280–$330 range, a break-even somewhere around $215, and a take-home around $235.
Now change one thing — bump drive time to 1.5 hours one-way (real Dallas traffic). Watch what happens to break-even. That's the entire point of the tool: little input changes, real dollar consequences, visible in real time.
What a paid account adds on top
The free calculator is genuinely useful on its own — it's the same math engine, and the research tiles (Maps, Weather, Fuel, LAANC) are wide open. Here's the short list of what creating an account opens up — most of which will get their own posts:
- AI Bid Recommendation. A second-opinion price built from your inputs and the local market, with a written rationale you can sanity-check before you send a quote.
- Local Industry Benchmark. A typical pricing range for your region and service type, with a warning when your price drifts below market.
- Auto-fine-tuning post-processing time. Rotor Rate quietly logs your actual edit/upload hours on every finished job and surfaces a rolling 30-job average per network + deliverable combo, so your future quotes lean on your own history instead of an industry midpoint.
- Missions management. A dedicated dashboard for your forward-looking pipeline — Pipeline, Upcoming, and Recurring — with calendar invites, chained/recurring job support, and a Chain Builder that lets you preview combined margin across linked missions before you accept. Completed jobs, debriefs, and actuals-vs-estimates live in the new Workspace section so your active pipeline stays uncluttered.
- Business management. Light-touch back-office tools: expense tracking, mileage logs that flow into your tax estimates, quarterly tax widget, invoice/quote sending, and a quick-glance income breakdown — the stuff that usually lives in three different apps, kept next to the jobs that produced the numbers.
Free vs. paid — full breakdown coming soon. The short version: the free calculator gives you the math engine and the research tiles (Maps, Weather, Fuel, LAANC). A paid account layers three things on top of that — sharper math tuned to your gear, rates, and platform mix; missions management for your pipeline, debriefs, and chained/recurring jobs; and business management for expenses, mileage, quarterly tax, and invoicing. A dedicated post walking through each side feature-by-feature is in the works — this post is just the highlights so you know what's in the box.
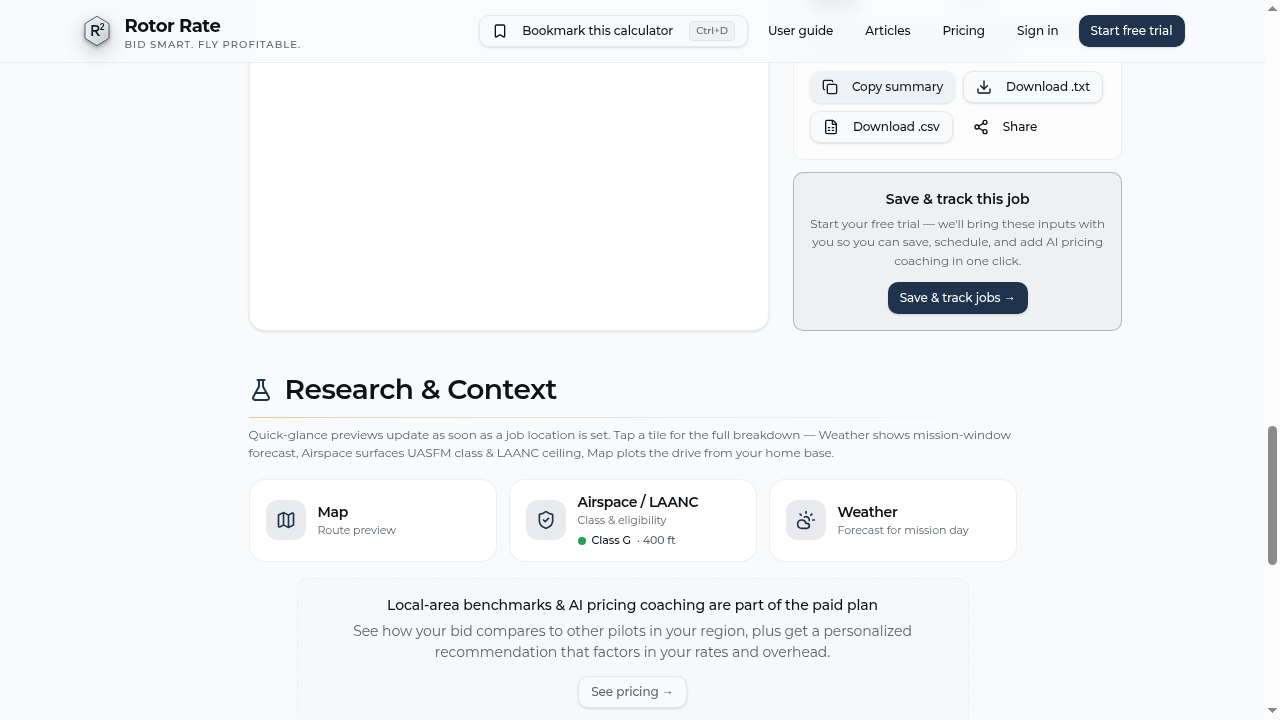
Beyond the workflow tools, a paid account also sharpens the math itself. The free calculator uses sensible industry defaults so anyone can get a usable number in 30 seconds — but every pilot, every airframe, and every client platform is a little different. Once you sign in, those defaults give way to inputs tuned to your business:
- Your own rates and gear costs, saved. $200/hr fly is a starting point, not necessarily your number. Experience, sensor, and what you're capturing should all shift it.
- Sensor multiplier. A 1" RGB sensor real estate shoot and a thermal inspection are not the same job. The full app adjusts for that.
- Platform-specific math. FlyGuys, Zeitview, RAAD, direct clients — as alluded to earlier, each has its own fee structure and quirks, with presets per platform.
The one habit that pays for itself
If you remember nothing else from this post, remember this: never quote without running the numbers.
Even a 30-second pass through the calculator catches the jobs that would have quietly cost you money. The price you "feel" is almost always the price someone else trained you to accept. The price the math gives you is the one you can actually defend — to the client, and to yourself.
Open and bookmark the free calculator now: **rotorrate.com/calculator**. Plug in a real job you've quoted before. See what comes out. If it's higher than what you charged, that's not the calculator being wrong — that's a paycheck you left on the table. There are links to a rate builder if you need to figure out a $/hr rate, and links to what (or if) to charge for drive time. Explore and check it out.
We'll go deeper on each piece (sensor multiplier, the research tools, what experience does to your hourly) in other articles. Again, congratulations on getting your Part 107, you've made the first step of many on this incredible journey. Fly safe, price smart.
Sources & further reading
Beginners benefit from going straight to primary sources for FAA rules and pricing fundamentals:
FAA primary sources
- FAA — *Part 107 — Commercial Operators overview
- FAA — *LAANC — Low Altitude Authorization and Notification Capability
- FAA — *Remote ID for drones
Pricing & cost inputs
- McKinsey & Company — *The power of pricing
- IRS — *Standard mileage rates
- U.S. Energy Information Administration — *Gasoline and Diesel Fuel Update
Industry data
- Drone Industry Insights (DroneII) — *Drone Industry Insights — market reports
- Skylogic Research — *DroneAnalyst / Skylogic Research
Rotor Rate companion reads
Related guides
Go deeper on the rest of the drone-pricing topic — same framework, different angle.
Swipe for 2 links →
Next steps
What to do once you have a number you trust.
Swipe for 2 links →